


Solar Panel Wiring Diagram: A Step-by-Step Guide
Solar panels are great to have, but they can be a bit confusing to install. The wiring diagrams are especially intimidating for those that don’t know what they’re looking at. To help clear things up, we put together this beginner-friendly guide on solar panel wiring diagrams. So what are solar panel wiring diagrams?
What is a Solar Panel Wiring Diagram?
A solar panel wiring diagram is a roadmap, a guide, and a blueprint. But instead of leading you to a hidden treasure or showing you the quickest route to your favorite restaurant, it's all about the journey of energy - from the radiant sun to your home appliances. Sounds exciting, right? Let's dive in!
What's in a Diagram?
Imagine you're trying to assemble a piece of furniture, but you've lost the instruction manual. You're left with a pile of parts and no idea how they fit together. That's where a diagram comes in handy. It's a visual representation of how different components connect and interact.
In the context of solar energy, a solar panel wiring diagram is just that - a visual guide that shows how your solar panels connect to your battery, inverter, and the rest of your solar energy system. It's the roadmap that energy follows from the sun to your light bulbs.
Why is it Important?
You might be thinking, "Why do I need a diagram? Can't I just connect the wires and hope for the best?" Well, not quite. Here's why:
- Safety: Solar systems deal with high voltage and current. A wrong connection can lead to electrical shocks or fires. A well-drawn diagram ensures you're making the right connections.
- Efficiency: A correctly wired solar system will perform optimally, providing you with the maximum possible energy from your solar panels.
- Troubleshooting: If something goes wrong, your diagram is the first place you'll look. It helps you identify potential issues and fix them quickly.
What Does it Look Like?
A typical solar panel wiring diagram might look a bit complex at first but don't worry, it's not as scary as it seems. Here's what you'll usually find:
- Solar Panels: These are your energy producers. They capture sunlight and convert it into electricity.
- Charge Controller: This device regulates the voltage and current coming from your solar panels. It ensures your batteries are charged properly and not overcharged.
- Battery Bank: This is where your energy is stored for later use.
- Inverter: This device converts the direct current (DC) from your panels and battery into alternating current (AC), which is used by most home appliances.
- Loads: These are your appliances and devices that use the electricity your system produces.
Each of these components is connected by wires, and the diagram shows you exactly how to wire them together. It's your step-by-step guide to setting up your solar energy system.
In the next section, we'll show you how to create your own solar panel wiring diagram with the help of an application called Canva.
How to Create Your Solar Panel Wiring Diagram with Canva (Step-by-Step)
So, you're ready to take the plunge into the world of solar energy, and you've decided to start by creating your own solar panel wiring diagram. That's fantastic! But where do you start? Don't worry, we've got your back. Let's break it down step-by-step using Canva, a user-friendly graphic design platform.
Step 1: Sign Up for Canva
First things first, you'll need a Canva account. If you don't have one, head over to Canva and sign up. It's free and only takes a minute.
Step 2: Choose a Template
Once you're logged in, click on the "Create a design" button on the top right corner. In the search bar, type "Flowchart" and select the option. Canva will present you with a variety of flowchart templates. Choose one that you like or start with a blank template.
Step 3: Understand Your Components
Before you start designing, you need to know what you're designing. Remember the components we discussed in the previous section? You'll need to represent each of them in your diagram.
- Solar Panels
- Charge Controller
- Battery Bank
- Inverter
- Loads
Step 4: Add Your Components to the Canvas
Now, it's time to start designing. On the left side of the screen, you'll see a toolbar. Click on the "Elements" tab. Here, you can search for shapes or icons that represent each component. Drag and drop them onto your canvas.
Step 5: Connect the Dots
Next, you'll need to show how these components are connected. Go back to the "Elements" tab and select the "Lines" option. You'll see a variety of lines and arrows. Choose the ones that best represent your connections and drag them onto the canvas to connect your components.
Step 6: Label Everything
A diagram without labels is like a map without names. It's confusing and not very helpful. So, make sure to label all your components and connections. Click on the "Text" tab in the toolbar to add text boxes to your diagram.
Step 7: Review and Save
Finally, take a moment to review your diagram. Make sure everything is connected correctly and all your labels are clear and accurate. Once you're satisfied, click on the "Download" button at the top right corner to save your masterpiece.
And voila! You've just created your own solar panel wiring diagram. Now, you're one step closer to harnessing the power of the sun. Isn't that electrifying?
Stay tuned for the next section where we'll dive into a specific example - a solar panel wiring diagram for a campervan.
Solar Panel Wiring Diagram For Campervan
Alright, let's get our hands dirty and dive into the nitty-gritty of putting together a solar panel wiring diagram for a campervan.
The Components
First things first, let's talk about the components you'll need for your solar setup:
- 200-Watt Solar Panel: This is your power generator. It's going to soak up the sun and convert it into electricity.
- 30 Amp MPPT Charge Controller: This little device is crucial. It regulates the power coming from your solar panel and charges your battery efficiently.
- 150Ah Deep Cycle Battery: This is your energy storage. It's going to store the power generated by your solar panel for use when the sun isn't shining.
- 600 Watt Pure Sine Wave Inverter: This device converts the direct current (DC) from your battery into alternating current (AC), which is what most appliances use.
- DC Fuse Box: This is your safety net. It protects your devices from any power surges or electrical faults.
- 12V LED Lights: Your lighting solution for those late-night card games in the campervan.
- 12V Water Pump: For those much-needed showers after a day of hiking.
- 12V Refrigerator: To keep your food fresh and your drinks cold.
- 12V USB Charging Ports: To keep your devices charged and ready to capture those unforgettable moments.
Creating the Diagram
Now that we've got our components, it's time to connect them. Here's how it goes:
- Solar Panel to Charge Controller: Connect your solar panel to your charge controller. This is where the power generation starts.
- Charge Controller to Battery: Connect your charge controller to your battery. The charge controller will regulate the power and charge your battery.
- Battery to Inverter: Connect your battery to your inverter. The inverter will convert the DC power from your battery into AC power for your appliances.
- Battery to DC Fuse Box: Connect your battery to your DC fuse box. This will provide power to your DC devices and protect them from any electrical faults.
- DC Fuse Box to Devices: Connect your DC fuse box to your DC devices (LED lights, water pump, refrigerator, and USB charging ports).
Here's a basic diagram to visualize the connections between the components of your solar power setup in your campervan:
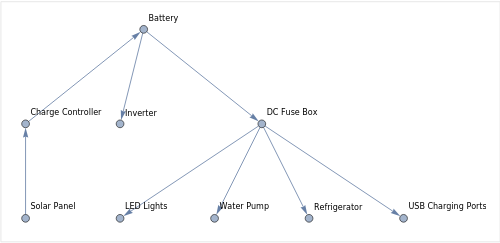
This diagram shows the flow of electricity from the solar panel, through the charge controller, to the battery, and then to your devices. The DC Fuse Box is connected to the battery and provides power to your DC devices, protecting them from any electrical faults.
Remember, this is a simplified diagram and actual installation may require additional components and considerations for safety and efficiency. Always consult with a professional if you're unsure.
And there you have it! You've just created your own solar panel wiring diagram for your campervan.

Conclusion
From understanding what a solar panel wiring diagram is, to creating your own with Canva, and even diving into a specific example for a campervan, you're now equipped with the knowledge to harness the power of the sun.
Remember, a solar panel wiring diagram is more than just a bunch of lines and symbols. It's your roadmap to a sustainable, eco-friendly, and self-sufficient lifestyle. It's the blueprint that turns the sun's energy into a cool breeze from your fan, a cold drink from your fridge, or a charged phone ready to capture your next adventure.
So, here's to you, the future of energy, and the countless sun-powered adventures that lie ahead. The future is bright, and it's powered by you.


Be the First to Know


